Showing posts with label Card. Show all posts

Thursday, October 6, 2011

Birthday Cards

During the Popular Book Fair in September, I bought some art & craft material for Abigail and myself to enjoy doing some crafty work. :) In September month Abigail had done 5 cards for 5 birthday girl/boy. :) I have to admit that I'm not a camera person, I dont have the habit of taking photo now and then. Even the 2 cards below, I only remember before I sent it out by post. I have to unseal them to take photo then seal it again.

On 2 September, Abigail did a card for her best friend, Christabel. It was a simple card. I guess one day I have to go to Bel's house to snap a photo of her birthday card. :)

On 11 September, Abigail did a simple card to Aunty Wan Siang for her birthday.

On 22 September, Abigail did two cards for Dorcas, her cousin and Tai Yi's Birthday. I then tell her we're going to send the card to them by post to give them a surprise! She was very excited. I only sent out on 26 Sept, the birthday of Dorcas and they receive the card on 29 Sept. I would said it's fast! from KL to Kuching is only 3 days!

On 1 October, she did a card for Zen Xuen, her kindy friend which is also my school-mate's son! :)

I first prepare the layout of the card then I'll share my idea to Abigail what I planned to. It's kind of instruction to her but in a discussion way. :) I get her to do all the stamping e.g. balloons, party hat, cake, gift box, bubble. After stamping it looks a bit blend... then i get her to give some colour to it.
This is the front page of the card.

Suppose, I wanted her to do all the writing but her handwriting is really messy :Þ and being a fussy mama, I cant bear with the mess! So, I did the main writing and get her to write her own name only. :Þ Then I get her to choose a sticker for Dorcas and put some stars to light up the card.

This card is for Tai Yi. I did the front page and do the design cutting with those special scissors.

I then get Abigail to do the stamping and colouring. I learnt a lesson that day. Never get the child to do two cards in one go... she's tired. and when she did her colouring, she didnt give her best.
Then she choose a sticker and sign the card... put some sticker stars to light up the card! :)

Tuesday, June 21, 2011

Birthday card for kong kong

May, 2011

My dad's birthday was a week right after my mom's birthday. I get Abigail to do a card for kong kong.

Steps:
1. First, I draw a heart shape on a paper, then get her to paint it then leave it to dry.
2. Then I cut it out and get her to paste on the yellow card.
3. Then paste the wording "Jesus loves you" on the paper and then get her to paste the glittering items on it to make it shine!
4. Then I get her and Joshua to paste the star on the card randomly. Yes! Even Joshua can do it. :)
5. Finally, I hold Abigail's hand to write her name and Joshua's name on the card.


Wednesday, April 20, 2011

Pasting Craft for Toddler

Abigail was down with viral infection. During the days she was at home, she done this craft.

Materials
1. Creep paper (few colours)
2. Paper

Steps
I drew a flower on a white paper.
Prepare the creep paper by cutting into smaller pieces and roll it.
Then get Abigail to paste the creep paper on the flower.
I first start with yellow colour with her after completed, red one, then green one. She put glue and do the pasting all by herself.
After completed the craft and let it dry up. Then I paste it into a bigger paper.
I let her choose some sticker to decorate the card.
Lastly, I hold her hand to write those wording.

This craft is very simple and it's suitable for toddler to do. Abigail was 3.5 years old when she did this and she can do it all by herself. In fact the rolling part, she can participate too. If you have the time, can get the child to roll the paper and do the pasting all by the child. I believe the child can handle and perhaps they will enjoy doing it. :)

Birthday Card for popo

Thursday, November 25, 2010

Thank You Card

17 Nov, 2010

It was a public holiday. We did not go anywhere... morning James brought Joshua to see doctor as he had a bad cough. Joshua had a nebulizer at the clinic and he's on antibiotic as he his throat was infected and it's red. He had no fever, just cough, flu and a lot of phlegm. After the nebulizer, he's very much better, less cough.

After Joshua went for his afternoon nap, I did a Thank You card with Abigail for her teacher as Friday will be the last day of the school. Ms Cheryl, her kindy teacher will stop teaching in her kindy and go for full timer worker in her church. So, I want Abigail to learn to thank her teacher for teaching her.

I prepared the materials:
1. a trophy on gold or silver paper (your choice)
2. 3 pockets for the card to write notes on it
3. a triangle shape paper for the trophy and small flowers in different colours
4. wording for the card (your choice for the wording)
5. photo (I suppose wanted to put Abigail & Ms Cheryl's photo but I don't manage to take a photo of them)

Craft:
After cutting out all the materials (paper).
1. I folded an A4 paper into half as my main card then I first get Abigail to stick (with help) the trophy on the paper. If your child cannot stick the paper orderly, you can hold her hands as you do the sticking.
2. After that I hold her hands to stick the three pocket at the side of the card. Then I get her to stick three flowers on the pocket. Up to her where she wants it to be and her choice of the colour.
3. Then I prepare three smaller red card to put three notes on it. "Thank you for teaching me ABC", Thank you for teaching me 123" and Thank you for loving me. I slot the three cards into the three pockets.
4. Then I hold her hands to write "Teacher of the Year 2010" on the yellow colour triangel shape paper and stick it on the trophy. Then I hold her hands to put some glittering items on it.
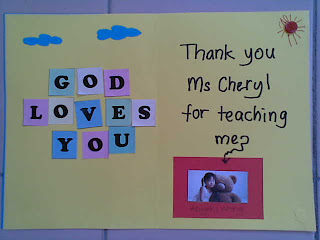
5. After the cover page is done and dry up. Then I get her to stick the wording inside, "God Loves You".
6. On the other side, I hold her hand and wrote "Thank you Ms Cheryl for teaching me".
7. And finally, I stick her photo on it and hold her hands to write her name on it.

The card is done!  :)